
By Cynthia Cooper ©
There’s a saying – “Go shoe-less but not clue-less” so here’s another –
“Go bit-less but not wit-less”. (I’m sure it’s been said before)!
So you’ve decided to listen to your horse and get rid of the bit. You may have read about or heard of the negative effects a bit can have on a horse, or you may just want to try riding bitless to see if your horse would prefer not to have a lump of metal in his mouth.
Perhaps you’ve ridden for a long time in a rope halter or hackamore and decided it’s time to refine things, so a bitless bridle is the next step.
Or maybe you’d like to go out in public or compete without a bit but don’t want to be frowned upon for riding in a halter.
Whatever the reason, here are some things you can do to make the transition to using a bitless bridle smooth and safe for you and your horse.
The first consideration should be the type of bridle you choose – will it suit your horse and the disciplines you’d like to ride in?
Depending on the country you live in, there are various choices, but with the internet and web shops these days, you can pretty much choose from a world wide source.
A Google search on bitless bridles will yield thousands of results.
When it comes down to basics though, there are mostly two types of bitless bridle – the cross-under style that works on whole head pressure, and the side-pull style and variations that work mostly on nose pressure.
Your horse may respond better to one style over another so its worth getting one of each type to try out. Most companies selling them allow you to return the bridle within a certain time if it doesn’t suit your horse.
As with any new piece of equipment though, you probably need to give your horse enough time to adapt and learn how to respond before deciding which bridle to keep.
So where do you start?
It really depends on whether your horse has been ridden bitless in a rope halter or natural hackamore previously. If they have, and you have educated them using natural or good horsemanship principles, their transition will be quicker because you will already have some good habits (I hope!) in place.
What we do as riders ultimately affects how our horse responds to a bitless bridle. You could put the bridle on the horse and turn it loose (without reins and under constant observation in a safe yard) and the horse would most likely go about its business with no problems.
In fact, that’s a good way to introduce the bridle and take note of how the horse feels about it before any pressure is applied. The cross-under style bridles will generally require the noseband to be fitted firm for safe riding as well as correct and efficient function of the design but for this exercise, keep it reasonably loose so the horse can eat, drink and be comfortable.
Be sure there’s nothing the horse can catch the bridle on if it rubs on a post etc.
Fitting the bridle:
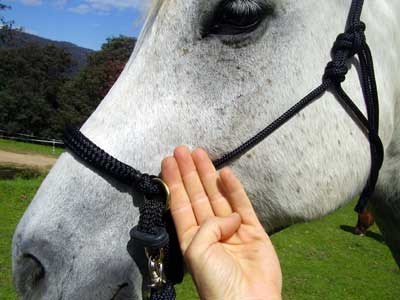
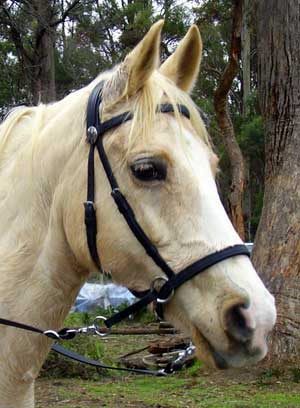
Wearing the bridle for a while will also reveal if your fit is correct. Most commonly, the noseband can slip down as the headpiece settles in behind the ears. The crossover style bridles such as the Dr Cook or No-Bit require a slightly lower noseband position than the side-pull styles such as the Light Rider – generally 3 finger widths below the prominent cheek bones is a good starting point.
Dr Cook’s comes with full fitting instructions, and these should followed carefully. Adjusted properly, the noseband sits on the bone between the false nostrils and does not cause pain. Fitted no lower this, it is anatomically impossible for it to obstruct breathing – they’re not called ‘false’ nostrils for nothing! Fitted higher or looser like the noseband on bitted bridles, the noseband on the cross-under design can ride up and down, which can cause discomfort/pain and may also prevent the pressure from being displaced gently across the whole head.
A well fitting brow band will also help the comfort of the bridle – if it’s too small it will pull the headpiece in tight against the ears and a too large brow band may slip down over the TMJ joint (bony piece above the eye) again causing discomfort.
The rope bitless bridles should also have the cheek pieces come in behind the large jaw bones – almost where the throatlatch would normally sit.
If this causes the noseband to be positioned too high near the prominent cheek bones, then the bridle is too small for your horse.
Something else to check is that the chinstrap (if it has one) fits snugly without being overly tight or loose, and that the reins are the right length for your horse’s neck.
Ideally they should allow you to hold them at ‘the buckle’ without having to stretch forward while your horse grazes.
Starting with Groundwork:
The best way to check that your horse responds to the bitless bridle is where you are safe – on the ground.
Start by asking your horse to yield to pressure on one rein, first to the left while you are standing at the girth, then do the same on the right side.
If your horse has been taught to yield to a rope halter, this should be a familiar exercise, but remember you are using a new piece of equipment which may put pressure on a different part of the head so accept a small response first.
You will find your horse responds better to a rhythmic ‘asking with on-off pressure’ rein than a steady pull. Close and open your fingers gently, in a rhythm a bit like covering each hole of a recorder or flute in sequence.
Any steady pull on the horse’s head usually sets up a brace or ‘opposition’ response because this is innate behaviour – your horse is programmed by nature to oppose pressure automatically, until they are educated to understand that certain types of pressure mean certain things.
The crossunder bitless bridle uses this principle; for turning left or right the design applies gentle pressure to the opposite side of the head, so that the horse is moving away, rather than into, the pressure.

When your horse can ‘give’ his head and hold lateral flexion for a few seconds while you give his head a rub or even release the rein totally by dropping it over the neck, it is safe to get on.But before you do, it is also worth checking that your horse understands turning while in motion so walk your horse and use a directing rein to make turns to the left and right as you are moving.
This also gives you the opportunity to check out stopping. Rather than pulling on both reins together though, ask with a gentle lift and feel on one rein then the other – again in a rhythmic way to get the stop.
Once you have stopped, use the same kind of rhythm on each rein in turn to get a back up. If your horse doesn’t understand, take the reins in one hand and use a light rhythmic press on the horse’s chest to help.
It’s a good idea to repeat these exercises from each side of the horse so they are learned from both eyes and directions.
One more exercise I like to check on the ground is that my horse can yield the hindquarters to a gentle touch from my stirrup, about where my leg would give the aid.
First, ask your horse to yield their head a little towards you, then while holding this position, press the stirrup rhythmically against the horse’s side. If there is no response to a gentle pressure (no more than the skin being moved – if you indent muscle then you are pushing too hard), rather than give up or get firmer, add a rhythmic upwards lift to the rein. Keep this going with your own energy up and focus on the hindquarters until you get a result. This generally doesn’t take long if you keep up the rhythm on both stirrup and rein.
If you can do this exercise at the standstill, then also try it from the walk and trot to be sure your horse will listen to your leg – this is your brake!
Yielding the head in lateral flexion is like putting on the handbrake, so yielding the hindquarters takes the energy out of the horse’s powerhouse, therefore slowing it down (unless you are doing this in collection to supple the horse through lateral leg yields like half pass, shoulder in etc.).
Starting in the saddle:
This is best done in an enclosed arena or round yard, even a small paddock to be safe.
Start by going through the same exercises you did on the ground; lateral flexion, yielding the hindquarters, back up, then walking, turning, stopping and checking your lateral flexion again.
If your horse responds well at the walk, check out the trot and then the canter if you are up to that stage in your riding. You don’t have to do this all in the first ride either!
Check that you can stop by letting your energy down and gently squeezing each rein alternately, and also by yielding the hindquarters.
A nice exercise that helps the horse understand this, is to ride along the fence, yield the hindquarters away from the fence and turn the head towards it, to come to a stop facing the fence.
Read more about controlling your horse through the hind quarter yield – ‘Disengagement is a Powerful Control’.
Overcoming Issues:
Understandably, some riders may be nervous or anxious about riding their horse the first time without a bit and, unknowingly, use a lot of contact.
Strong contact is not usually necessary with a bitless bridle as communication is clearer and un-obscured by pain. If your horse is reacting to the bridle with head tossing, pulling, getting anxious or over excited, pawing, grinding their teeth or throwing their head up, it can help to ride with less contact than you have previously been using.
If a rider has been using rein pressure on a bitted bridle to achieve a semblance of what they think of as collection, they will initially be disappointed with the bitless bridle and may even decide that ‘it doesn’t work.’

Bit-induced poll flexion, however, is not the same as true collection … it is false collection.
With patience and proper training, a bitless bridle will provide all the collection that a rider desires. This process cannot and should not be hurried.
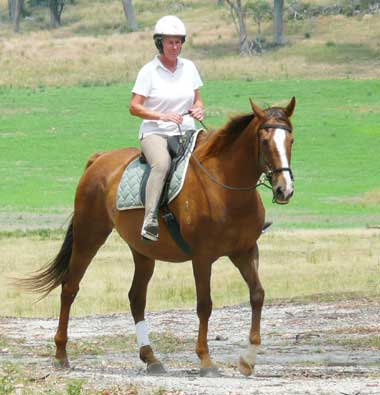
An educated horse that easily yields to pressure may even ‘over flex’ (as seen in this photo) in response to the bitless bridle, so use a longer rein and light, rhythmic feel on the reins to offer some ‘give’ in the pressure. Over flexing is a sign the horse is trying to get comfort from the constant pressure.
When you feel confident that your can control your horse easily and your horse seems happy in the bitless bridle, its time to venture out of the arena or pasture.
Rather than throw your horse in the ‘deep end’ by joining a group of friends for a long trail ride, just go on your own for a short ride, or with one other sympathetic friend.
Stick to places you know both you and your horse can be relaxed and enjoy the ride. This isn’t the time to test out a new trail, go faster than usual or negotiate obstacles you haven’t tried before.
Once your horse is going comfortably in the bitless bridle, you can then tackle new things, adding pressure in small increments for success. Many riders will find their horse is more relaxed without the worry of a bit in their mouth. Even if they unbalance their rider a little, with a shy or an awkward jump, the grab at the reins for balance will only give a bump on the cheek or nose, rather than a jab in the mouth.
If your horse doesn’t seem happy in the bitless bridle, remember that you have eliminated discomfort in the mouth by removing the bit, but your horse may still be feeling discomfort elsewhere which was previously masked by the
over-riding pain in the mouth.
The two most common sites are the back from poor saddle fit and the hooves from poor shoeing or trimming practices.
For example, bucking may be in response to pain from the saddle or even the girth, not just from pure exhilaration or getting out of control.
Always eliminate all sources of physical pain before embarking on a re-education program. Remember the horse is only ‘misbehaving’ because that is the only way they can tell us something is not right or is hurting them.
A common cause of a ‘bad’ reaction to a bitless bridle may be sharp teeth –especially upper molars. The noseband may be causing pain which cannot be eliminated until the teeth have been floated. Also be careful with the cross-under biltess bridle that you have not trapped any whiskers or long chin hairs under the noseband buckle or cross-under straps.
Sometimes after the first few rides, your horse may be resistant to turning left or right. Most horses, like humans, have their ‘good sides’ and are better in one direction than another, but if this doesn’t improve within half a dozen rides or so, look for another explanation.
There may be a problem that, until now, has been masked by the pain of the bit. A horse that is stiff to turn in a bitless bridle may need some bodywork or may be reacting to a stiff or crooked rider.
Maybe the horse seemed easier to turn in the bit because discomfort in the mouth outweighed everything else.

Use of the Bitless Bridle should not be considered a substitute for education. Although many horses do adapt instantly, or almost instantly, sometimes you do see a few new resistances (or the re-emergence of “old” ones that you thought you had cured when bitted), such as head tossing or rushing.
These are typically seen on the first ride only, for obvious reasons. But sometimes they emerge quite suddenly on about the second or third ride.
It may be that the rider has become more confident about the new head gear,
and starts to ask for a little more. Then it becomes a matter of fine-tuning and adjustment for the next few rides to give your horse confidence again.
As with any new exercise or piece of equipment you introduce, don’t expect it to be a ‘quick fix’ for a particular problem. Mind you, sometimes it can be with a bitless bridle because removing the bit instantly gives the horse comfort and confidence that it won’t have it’s mouth jabbed or constantly pulled on.
Expect an adjustment period and alter your expectations accordingly, and the transition to riding in a bitless bridle will be painless for both you and your horse.
If your transition isn’t going as smoothly as you’d like, rather than give up, seek the assistance of an
instructor or approved fitter of bitless bridles experienced in riding with one to help you. Sometimes all it takes is another pair of eyes to pick up something you’ve missed.
There is a growing number of people and horses having a much happier time riding now that they have changed to a bitless bridle, so give it a go!
See the Bitless Basics Video below for a visual overview.

“I just wanted to let you know that Pete (my horse) and I are loving the bitless bridle. It was a really smooth transition from bit to bitless and don’t think we’ll ever look back.” Jacqui, Tasmania.


Do you have any advice on lunging or long-lining them bitless?
Hi Ariel, I do have a post written on lunging bitless here: https://naturalhorseworld.com/lunging-to-connection/ and here’s a video I recommend: https://youtu.be/18p-dLzHC0M
As far as long-lining goes the best advice I can give to start with is to use lightweight cotton lines so that there is still a good release on the rein. Be sure to teach your horse verbal cues first, and use a helper to lead the horse initially as these are being established with you behind.
You can also transition from lunging with 1 rein to driving with 2 reins from the lunging position so I’d always establish lunging before trying to drive in long reins.
I hope that helps – I couldn’t find a video I’d recommend for long reining so it looks like I’ll need to film one!
Cheers, Cynthia.
My new Andalusian is having problems with some incoming teeth, so I have decided to take this opportunity to start him bitless. So far we have done lunging and floor work with a cavecon, but the time is right for some riding to keep things interesting. I have been preparing for Doma Vaquera riding, which is based on the principles you are talking about, so having discovered your site is certainly going to be a big help in that direction! Less is more!
That’s wonderful to hear Virginia and I’m sure your young horse will be happy with learning bitless 🙂
Just hop on and ride them and listen to the horse and watch them relax only takes a few minutes for it to realise no more pain.
The biggest pain is the human brain!